
How to Get Started on Zwift: All You Need to Know!
- James G Triathlon
- May 27, 2021
- 12 min read

Updated: Jul 21, 2021

Who doesn't love a pair of dotted socks!
If you're reading this, the chances are that you've considered indoor bike training and are now thinking is it worth spending on your hard-earned cash on, and more importantly - how to I make it FUN!
Zwift is an online, interactive cycling game where your effort on the bike in the real-world is replicated by your avatar in the game. The harder you pedal, the faster your avatar goes. Zwift is connected to your bike through a smart trainer and Bluetooth technology. Zwift communicates via this Bluetooth connection to control the resistance of your smart trainer, making it easier or harder to pedal depending on the terrain of the course you're riding in the online game.
If you want to start "Zwifting" you've come to the right place!
In this post I'll cover these things for you:
all you need to know about Zwift, based on my own experiences of using it to get you inspired and motivated to have fun with your indoor training.
Let's begin!
What is Zwift?
As mentioned at the top, Zwift is an online app for cyclists, runners, and triathletes that makes indoor training fun.
It was launched in September 2014 by Jon Mayfield, Eric Min, Scott Barger and Alarik Myrin and has had over 2.5 million accounts registered since it's launch.
Zwift is primed to operate in a broader fitness market and deliver on our ambition to provide gamified fitness through integrated software and hardware, to anyone who wants to have fun while getting fit at home - CEO Eric Min
Signing Up for Zwift
It's very straightforward to register and Zwift offer a 7-day free trial which you can sign up for here.

After the trial has finished, you can sign up for a monthly subscription for $14.99. Pretty good value in my book!
What Gear Do You Need to Zwift?
To get started on Zwift you'll need a few essentials. These are:
Bike
Smart Trainer
Laptop
Fan
Floor Mat
Towel
Electrical Output
Let's go into WHY you need these in a bit more detail.
Bike
Any bike will work on Zwift! You need a bike to power your in-game avatar.
Smart Trainer
Because Zwift works on power zones and many of the features require your power output to be recorded.
It is possible to get this added on a non-smart trainer - but I think if you're gonna take the plunge of getting involved with indoor training you might as well get some decent equipment that is going to save you time and trouble later on.
The smart trainer and Zwift connect via Bluetooth.

I have a Wahoo KICKR Snap, which is a mid-range indoor trainer.
Laptop, Tablet or TV
You'll need to get Zwift on a screen that you can watch the game while you cycle.
The bigger the screen you have, the easier it will be to see what's going on.
I perch my Macbook on a box and on our dining room table so it's at the correct eye-level for when I cycle.
You want the screen to be at a natural cycling eye-level so that you can ride normally and not have to strain your neck.
Mine is a pretty cobbled together low-cost solution but it does the job!

It is possible to run Zwift using a tablet but you'll need good eyesight!
And if you've got the budget you can high-end and hook up to an 84-inch TV!
Fan
This is more essential than it sounds!
With no natural wind to cool you down you'll be sweating like no man's business within a few minutes.
And once you've got the fan, don't forget to turn it on!!
Again, depending on your budget you can get fans with varying degrees of power. I have a fairly basic fan and need to use the air-con as well (I live in Thailand!)
Floor Mat
A couple of reasons why you need this.
First, you want to keep the front of the bike and your smart trainer steady and prevent them from slipping and tearing up your lovely flooring or carpet.
Secondly, you don't want all that sweat you create to drip down and pool up on the floor. Eeew!! And remember to clean the mat regularly!!
There are some top-end floor mats which are made specifically for indoor cycling, but for me I simply use a low cost yoga mat.
Towel
See above regarding sweat! No more needs to be said on this!
Electrical Output
Wherever you set up your indoor trainer and Zwift you'll need to be close to an electrical output.
When Zwifting, you'll need at least 2 outlets.
One to plug your smart trainer in
For your device that's running Zwift. It uses a lot of power and batteries will be drained quickly.
I learnt the error of not doing number 2 the hard way!
One time I forgot to plug in the MacBook and halfway through a workout the battery ran out, the machine died and machine just cut out and that was the end of my workout!
These are the basic essentials that I've been using and it's enough to get your started.
A couple of extra things you may want to consider...
Sweat Protector: Fits on the handlebars and top tube to catch the sweat. I just use a towel!
Indoor Trainer Tire: The roller that the rear wheel rubs against will cause the tire to eventually wear down and make it unsafe for outdoor riding.
How to Pair Zwift with Other Devices
Zwift uses Bluetooth to connect to the smart trainer and other devices that you'll use within the game.
Pl in your smart trainer, log in to Zwift and the sensors you need will connect automatically.
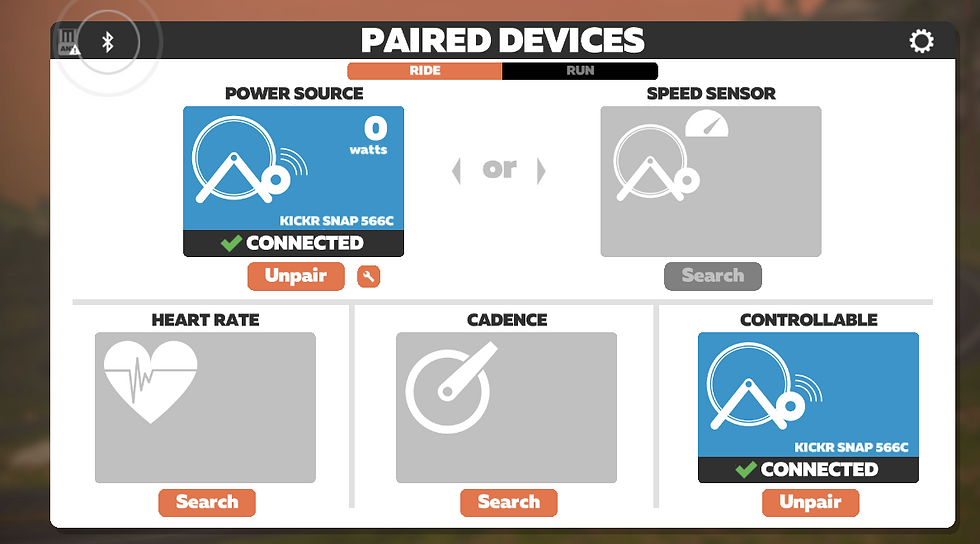
Power Source - this connection takes the power you're producing on the bike and relays it to your avatar in the game. This connection is essential if you want a fully interactive experience.
NOTE: Speed sensors are only needed if you're using a classic "dumb" trainer.
Controllable - this allows Zwift to control the resistance of your smart trainer. For example, replicating uphill or downhill gradients whereby the pedals become easier or harder to turn.
Heart Rate and Cadence sensors are optional and will allow you to track more metrics to analyze your performance.
If you're using a smart trainer, Zwift will calculate your speed using the power meter.
Zwift Home Screen Layout
So, you've logged in and paired up your devices. Next you'll see the Zwift home screen.

Quite a lot of info, right? Let's take a look at what it all means!
Routes
Choose from a number of routes to free ride on. You choose how fast (or slow!) you want to go. A great option for easy recovery rides.
Training
This will take you to huge number of the workouts and training plans available.
Upcoming Events
List of all group rides and races coming up. The "Zwift Companion" app gives you more detail about each ride so it's worth checking that out.
Join Another "Zwifter"
You can join and ride with another Zwifter simply by selecting the person you want to ride with, and then hitting the big orange “Ride With” button at the bottom.
This is useful if you want to ride with your friends who are already in the game.
Weekly Goals
You can set weekly or monthly goals based on time or distance.

Zwift Companion App
I also highly recommending downloading the Zwift Companion App available on Google Play or the Apple Store.

You can use the app to check and register for upcoming events, as well as viewing your past activites.

It also has a number of in-game options.
Ok, so time to look at your riding options in a bit more detail
What Rides Can I Do on Zwift?
There are 4 different types of rides you can do on Zwift. These are:
Free ride on a route in one of the 10 different worlds
Workout
Group Ride
Race
Let's dive into these in more detail.
What Worlds + Routes Are on Zwift?
Zwift has 10 worlds for you to play around in.

Watopia is always available and the other "worlds" alternate day-by-day.
Check out the "Guest Schedule" on the home page to see which world will be available on any given day.
After choosing the world you want to ride in, you'll see all of the routes available within that world.
You can sort them alphabetically, by distance or elevation gained.
This is useful if you want to ride a route that is mainly flat allowing you to cover a lot of distance and gain more points (points are used to level up) or if you want to take on some mountains Marco Pantani-style and build the power in your legs!
In the picture below, you can see the Tempus Fugit route is 17.2km long with 25m of elevation gain.
The Uber Pretzel offers a slightly different challenge and is 128.3km long with 2379m of elevation gain! Maybe not your first ride!

Here are some of the routes available in London.

Coming from England, and having lived in Thailand for over 10 years I do miss some of the famous sights in London, which are on show in most of these routes. It even replicates the grey, cloudy, rainy weather of the UK!!
If you just want to have a ride around on your own, these routes are great.
What's The FTP Test on Zwift?
Another ride option is to do a specific workout.
But before you do a workout you'll need to find out what your Functional Threshold Power (FTP) is by taking an FTP test.
FTP tests are used to identify the likely max power you can reasonably hold for an hour-long time trial, usually calculated while you put out your highest sustainable power for 20 minutes.
Your FTP is bascially an indication of how fit you are on a bike!
Finding out your FTP is important so you can ride in training zones that allow you to work toward specific cycling goals, such as riding faster, further, or both.
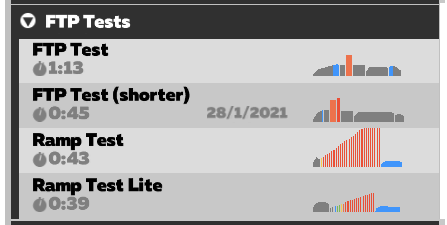
There are 4 different FTP tests to choose from on Zwift. They are:
FTP Test
FTP Test (Shorter)
Ramp Test
Ramp Test Lite
Zwift recommends that novice riders take the "Ramp Test" as it's easier to do the test correctly, and more experienced riders take either of the FTP tests which require better pacing but can produce more accurate results.
Once you've got your FTP you're ready to start training!
Zwift Workouts
There are literally thousands of workouts to choose from on Zwift to meet your training needs and goals based on:
time
distance
workout intensity
focus of the workout
It's easy to be overwhelmed with all these workouts and knowing which ones to do. I know I was when I first started "Zwifting"!
Read: What Are The Most Effective Workouts on Zwift
Take to the road for a "sweet-spot" session or maybe you wanna burst your lungs an burn your legs with a high-intensity VO2 max workout, or improve your aerobic endurance with a Zone 2-3 workout.

Within each Zwift workout you'll see different coloured segments. Each colour represents a different power zone, and therefore intensity. These are:

Read: Zwift Power Zones Explained
There's a workout of the week for you to choose from:

And you can choose workouts depending on how much time you have available. Perfect if you want to get a quick workout in before work or bed!

You can even do one of the workouts Mat Hayman used when he was recovering from a broken arm and went on to win the infamous Paris-Roubaix race just 6 weeks after breaking his arm and training on Zwift!

Zwift Training Plans
In addition to specific workouts, there are also a number of set training plans that you can sign up to and follow.
Choose your training plan based on:
your current level
what is your end goal
how much time you can train per week
I recently finished the "Build Me Up" training plan and found the following benefits:
convenience - each day I knew what I was going to do. I didn't need to think
variety - the focus of each workouts varied up to keep it interesting
motivation - I could see my progress throughout
improved power - I did an FTP test after 4 works and at the end and both showed an increase

What is ERG Mode?
As I've mentioned, the workouts are designed around your power zones.
However, trying to ride at a set power for any more than 10 minutes can be a challenge.
Not so much in that it's hard to maintain the power (unless it's Zone 6!!) but more because you need to concentrate and keep focused on the power you're putting out.
ERG mode is an option you can turn on during workouts. It works by ensuring the resistance of your smart trainer makes you output the required power from the segment.
For example. If you need to ride at 190W, the smart trainer and Zwift will communicate and the resistance on the trainer will require you to pedal at this power. Similarly with Zone 4, 5 and 6 efforts.
One word of caution! The difficulty and resistance of ERG mode is aligned to your cadence. So if you pedal slower the resistance will be higher. And vice-versa, if you pedal faster (higher cadence) the resistance will be easier.
There are differing options on the use of ERG mode.
Professional Coach and former National Champion Tom Bell says "using ERG mode is helpful for people who struggle to pace their efforts and regulate their power. There’s often a temptation to go harder than planned over the first few intervals, which might mean you can’t complete the last few. ERG mode prevents this by fixing the power in the correct range.
On the other hand, "Riding too often in ERG mode can also limit development of skills that are important in the real world. These include the ability to gauge your effort level and determine appropriate pacing,"
Personally I like to use ERG mode so that I know I'm hitting the exact power I need to for each workout to get the most out of it.
The only workouts where I don't use ERG mode are for the high-intensity intervals. With these intervals you may need to go from Zone 2 to Zone 6 in the blink of an eye, meaning your trainer will ramp up the resistance instantly and you'll need to match to avoid the spiral of death!
ERG mode isn't available in races or group rides so you can still use these rides to practice riding freely, and shouldn't be used for an FTP test.
Zwift Group Rides
These allow you to have the virtual experience of joining in a group ride.
They can vary in length and time and are ridden on a variety of courses.
Simply look at the "Upcoming Events" section on the Zwift home screen or open the Zwift Companion App to see which events are coming up.
One fascinating bit of technololgy is that the real-life effect of drafting replicated in group rides and races. So if you're riding in a group you'll be able to maintain a pace and not have to work as hard! Lovely!
Racing on Zwift
If you want to test yourself against other Zwifters then join a race!
There are lots of different races available every day over a variety of distances and elevation gains.
One of the nice things about Zwift racing is that racers are separated into categories depending on your power to weight ratio.
Your power to weight ratio is calculated by dividing your FTP by your weight.
For example, my FTP is 244 and I weigh around 83kg. So my power to weight ratio is 2.93
In this race you can see there are 4 categories:
Cat A = 4.0 - 5.0 W/KG
Cat B = 3.2 - 4.0 W/KG
Cat C = 2.5 - 3.1 W/KG
Cat D = 1.0 - 2.4 W/KG

Pimp Up Your Avatar
Zwift has 50 levels to define cyclists and after you reach a new level more equipment and clothing will become available in the "Zwift Garage" and "Drop Shop".
You move up levels by accumulating Experience Points (XP) which you earn by getting time in the saddle and putting in the miles (or kilometres).
You can see your progress towards the next level with the orange bar near the centre top of the screen. Each mile earns you 30 points, and each kilometre earns you 20 points.
Getting new bikes and wheels will make you faster, as their weight and aerodynamics are factored into the game engine.
Zwift In-Game Screen
The in-games screen will vary ever so slightly for the different type of ride that you're doing, whether it be a free ride, workout and race.
The in-game screen on Zwift will display:
power output
current speed
time elapsed on your current ride
distance cycled
elevation gained
your current level
mini-map
nearby zwifters or current position in a race
interval segments - WORKOUTS ONLY
Here are some lovely screenshots!
Free Ride
So, what data can we see in the screen below?
Current Power = 247w
Speed = 40kph
Distance = 29.3km
Elevation Gained = 156m
Time Elapsed = 49:30

The mini-map is in the top-right corner. The mini-map will show you the current gradient (currently 0%) and the upcoming route profile at the bottom (although it's not that clear and could be improved!).
This was a group ride on the Tour of Watopia. You can see other Zwifters on the right hand side. There were 150 people riding and I was in 58th position.
Workouts
If you're doing a workout many features will be the same and you'll also see the intervals or segments on the left hand side.
The centre of the screen will display what power you're required for this segment and for how long.

After completing a workout you'll have a summary screen which shows you the zones you were riding in plus the time, distance and calories burnt.

In the screenshot above you can see this was a sweet-spot session with the majority of work being done in zones 3 (green block) & zone 4 (yellow) close to FTP.
Races
The in-game screen for a race is similar to free ride, with the addition of the current positions on the right hand side.

And at the end of the race you'll see the final positions

Final Thoughts
I first bought my indoor trainer due to the poor air quality and quite often dangerous roads in Thailand.
At the time of writing I've had my trainer and been using Zwift for around 5 months and it's one of the best things I've ever used my money on.
It's super fun, there's a lot of variety in the rides you can and it's proving to be very effective in improving my FTP.
I can't recommend it enough!


Comments